If you don't get your confirmation email, please check your spam folder.
TARA - HIGH KINGS OF TARA
Singles - Level 2 - Kingdoms

2 Players
This variant is exactly the same as the Level 1 game, except for the rules below.
SACRIFICING RINGFORTS
- If one of your own kings has been captured, your two remaining kings have the additional power to sacrifice your own ringforts. This may only happen when all of your own kings are immobile and one of your kings backtracks to a friendly ringfort which is already besieged, fig. 1a. You may choose (on a case by case basis) whether to sacrifice it or not. If you do choose to sacrifice, you replace it with an enemy ringfort and link it with enemy bridges in the usual manner in the same turn.
- Your king is now standing on enemy territory, fig. 1b, but it is temporarily immune from capture. Unless the game is ended by your opponent by double capture on their next turn, on your next turn you must:
If the king is immobile: either backtrack again (you may also sacrifice again) or capture an enemy ringfort.
If the king has been trapped (escape route taken): the king is captured by default and you lose the game by double capture.
- Note: it is possible to capture an enemy king and sacrifice a ringfort, all in the same turn.
- Note: it is illegal to build a ringfort and then sacrifice it in the same turn.
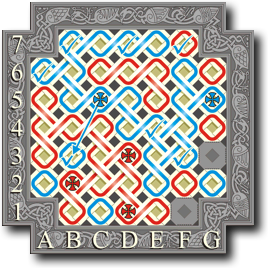
fig. 1a: Blue C5 backtracks to B3 and decides to sacrifice it.
fig. 1b: End of Blue's turn and Blue B3 is now on enemy territory and is temporarily immune from capture. Blue must backtrack B3 next turn to either C5, D4 or C1. If it's C1, that could be sacrificed also, then escape to E2.
However, it's Red's turn now and Red has four options:
Option A
Red passes, then Blue B3 escapes to C5 or D4. Red would have 6 kingdoms to Blue's 4, so Red loses with 1 point (for the king) to Blue's 4.
Option B
Red passes, then Blue sacrifices C1. Blue would hand a double capture win (2 points) to Red - very unlikely.
Option C
Red continues and allows Blue to sacrifice C1, then passes. Red would have 6 kingdoms to Blue's 3, so Red loses with 1 point to Blue's 5.
Option D
Red continues and allows Blue to sacrifice C1 and fill G3 and F1. Red would have 6 kingdoms to Blue's 3, so Red loses with 1 point to Blue's 5.
So Red's best option is A.